반응형
PedroTech님의 풀스택 강의 14일 차를 참고했습니다.
📌 Posts 수정 router 생성하기
// ./server/routes/Posts.js

const express = require("express");
const router = express.Router();
const { Posts, Likes } = require("../models");
const { validateTocken } = require("../middlewares/AuthMiddleware");

router.get("/", async (req, res) => {...
});

router.get("/byId/:id", async (req, res) => {...
});

router.get("/byuserId/:id", async (req, res) => {...
});

router.post("/", validateTocken, async (req, res) => {...
});

// 제목을 수정하면 호출될 router 입니다.
router.put("/title", validateTocken, async (req, res) => {
  const { newTitle, id } = req.body;
  await Posts.update({ title: newTitle }, { where: { id: id } });
  res.json(newTitle);
});

// 내용을 수정하면 호출될 router 입니다.
router.put("/postText", validateTocken, async (req, res) => {
  const { newText, id } = req.body;
  await Posts.update({ postText: newText }, { where: { id: id } });
  res.json(newText);
});

module.exports = router;router.put은 데이터를 업데이트할 때 사용되는 메서드입니다.
테이블의 특정 데이터를 업데이트하고 싶을 때는
테이블명.update({필드명: 업데이트_할_값}, {조건: {필드명: 필드값}}) 을 사용합니다.
📌 Posts 수정 router 호출하기
// ./client/src/pages/Post.js

import React, { useContext, useEffect, useState } from "react";
import { useParams } from "react-router-dom";
import axios from "axios";
import { AuthContext } from "../helpers/AuthContext";

function Post() {
  let { id } = useParams();
  const [postObject, setPostObject] = useState({});
  const [comments, setComments] = useState([]);
  const [newComment, setNewComment] = useState("");
  const { authState } = useContext(AuthContext);

  useEffect(() => {...
  }, []);

  const addComment = () => {...
  };

  const deleteComment = (id) => {...
  };

  // post의 제목과 내용을 수정할 수 있는 함수입니다.
  const editPost = (option) => {
    if (option === "title") {
      let newTitle = prompt("Enter New Title");
      axios.put(
        "http://localhost:3001/posts/title",
        { newTitle: newTitle, id: id },
        { headers: { accessTocken: localStorage.getItem("accessTocken") } }
      );
    } else {
      let newPostText = prompt("Enter New Text");
      axios.put(
        "http://localhost:3001/posts/postText",
        { newText: newPostText, id: id },
        { headers: { accessTocken: localStorage.getItem("accessTocken") } }
      );
    }
  };

  return (
    <div className="postPage">
      <div className="leftSide">
        <div className="posts" id="individual">

          {/* 제목을 클릭하면 수정할 수 있습니다. */}
          <div
            className="title"
            onClick={() => {
              if (authState.username === postObject.username) {
                editPost("title");
              }
            }}
          >
            {postObject.title}
          </div>

          {/* 내용을 클릭하면 수정할 수 있습니다. */}
          <div
            className="body"
            onClick={() => {
              if (authState.username === postObject.username) {
                editPost("body");
              }
            }}
          >
            {postObject.postText}
          </div>
          <div className="footer">{postObject.username}</div>
        </div>
      </div>
      <div className="rightSide">...
      </div>
    </div>
  );
}

export default Post;
editPost(수정 함수) 설명
1. option: 제목과 내용을 구분해서 수정하기 위해 필요한 매개변수입니다.
2. prompt(): 사용자가 입력할 수 있는 상자가 화면에 표시됩니다.
3. axios.put("경로", {new_: new_}, {headers: _}): 해당 경로로 new_와 headers 데이터를 전달합니다.
return 코드 설명
1. onClick(): 해당 요소를 클릭하면 실행되는 메서드입니다.
2. if(authState.authState.username === postObject.username): 현재 로그인한 사용자가 해당 post를 작성한 사람과 동일한지 확인해 주는 조건문입니다.
3. editPost("title"): option에 title값을 줘서 제목을 수정할 수 있도록 합니다.
4. editPost("body"): option에 body값을 줘서 내용을 수정할 수 있도록 합니다.
📌 Users 비밀번호 변경 router 생성하기
// ./server/routes/Users.js

const express = require("express");
const router = express.Router();
const { Users } = require("../models");
const bcrypt = require("bcrypt");
const { sign } = require("jsonwebtoken");
const { validateTocken } = require("../middlewares/AuthMiddleware");

router.post("/", async (req, res) => {...
});

router.post("/login", async (req, res) => {...
});

router.get("/auth", validateTocken, (req, res) => {...
});

router.get("/basicInfo/:id", async (req, res) => {...
});

// 비밀번호를 변경해주는 router입니다.
router.put("/changepassword", validateTocken, async (req, res) => {
  const { oldPassword, newPassword } = req.body;
  const user = await Users.findOne({ where: { username: req.user.username } });

  bcrypt.compare(oldPassword, user.password).then(async (match) => {
    if (!match) res.json({ error: "Wrong Password Entered!" });

    bcrypt.hash(newPassword, 10).then((hash) => {
      Users.update(
        { password: hash },
        { where: { username: req.user.username } }
      );
      res.json("SUCCESS");
    });
  });
});

module.exports = router;
코드 설명
1. Users.findOne({where: {username: req.user.username}}): 전달받은 데이터에서 username과 일치하는 데이터를 Users 테이블에서 1개 가져옵니다.
2. bcrypt.compare(oldPassword, user.password): 전달받은 기존 비밀번호와 사용자의 비밀번호를 비교해서 일치하면 True를 아니라면 False를 반환합니다.
3. bcrypt.hash(newPassword, 10): 새 비밀번호를 암호화해서 반환합니다. 2번째 매개변수의 크기가 커질수록 복잡하게 암호화를 해줍니다.
4. Users.update({password: hash}, {where: {username: req.user.username}}): Users 테이블에서 username이 req.user.username과 일치하는 데이터의 password를 hash로 업데이트해 줍니다.
📌 비밀번호 변경 페이지 생성하기
// ./client/App.js

import { BrowserRouter, Routes, Route, Link } from "react-router-dom";
import Home from "./pages/Home";
import "./App.css";
import CreatePost from "./pages/CreatePost";
import Post from "./pages/Post";
import Login from "./pages/Login";
import Registration from "./pages/Registration";
import Profile from "./pages/Profile";
import ChangePassword from "./pages/ChangePassword";
import { AuthContext } from "./helpers/AuthContext";
import { useEffect, useState } from "react";
import axios from "axios";

function App() {
  const [authState, setAuthState] = useState({...
  });

  useEffect(() => {...
  }, []);

  const logout = () => {...
  };

  return (
    <div className="App">
      <AuthContext.Provider value={{ authState, setAuthState }}>
        <BrowserRouter>
          <div className="nav">
            <Link to="/" className="link">...
            </Link>
            <Link to="/createpost" className="link">...
            </Link>

            {!authState.status ? (...
            )}

            {/* 아이디를 클릭하면 비밀번호 변경 페이지로 이동합니다. */}
            <h2 className="username">
              <Link to="/changepassword">{authState.username}</Link>
            </h2>
          </div>

          <Routes>
            <Route path="/" exact element={<Home />} />
            <Route path="/createpost" exact element={<CreatePost />} />
            <Route path="/post/:id" exact element={<Post />} />
            <Route path="/login" exact element={<Login />} />
            <Route path="/registration" exact element={<Registration />} />
            <Route path="/profile/:id" exact element={<Profile />} />

            {/* /changepassword로 이동하면 <ChangePassword/>를 보여줍니다. */}
            <Route path="/changepassword" exact element={<ChangePassword />} />
          </Routes>
        </BrowserRouter>
      </AuthContext.Provider>
    </div>
  );
}

export default App;
// ./client/pages/ChangePassword.js
import React, { useState } from "react";
import axios from "axios";
function ChangePassword() {
const [oldPassword, setOldPassword] = useState("");
const [newPassword, setNewPassword] = useState("");
const changePassword = () => {
axios
.put(
"http://localhost:3001/auth/changepassword",
{ oldPassword: oldPassword, newPassword: newPassword },
{ headers: { accessTocken: localStorage.getItem("accessTocken") } }
)
.then((response) => {
if (response.data.error) {
alert(response.data.error);
}
});
};
return (
<div>
<h1>ChangePassword</h1>
<input
type="text"
placeholder="Old Password..."
onChange={(e) => setOldPassword(e.target.value)}
/>
<input
type="text"
placeholder="New Password..."
onChange={(e) => setNewPassword(e.target.value)}
/>
<button type="button" onClick={changePassword}>
Save Changes
</button>
</div>
);
}
export default ChangePassword;App.js 설명
페이지의 route 설정과 페이지 이동할 수 있도록 설정했습니다.
ChangePassword.js 코드 설명
1. oldPassword, setOldPassword: 기존 비밀번호를 저장할 변수와 해당 변수를 수정할 함수입니다.
2. newPassword, setNewPassword: 새 비밀번호를 저장할 변수와 해당 변수를 수정할 함수입니다.
3. changePassword(): axios로 비밀번호 변경 router를 호출하고, 비밀번호 변수들과 사용자 정보를 전달해서 비밀번호를 변경해 주는 함수입니다.
4. onChange(): input 태그에 값이 변경될 때마다 호출되는 메서드입니다. 해당 값을 알맞은 변수에 저장합니다.
5. onClick(): 버튼을 클릭하면 changePassword 함수를 호출해 줍니다.
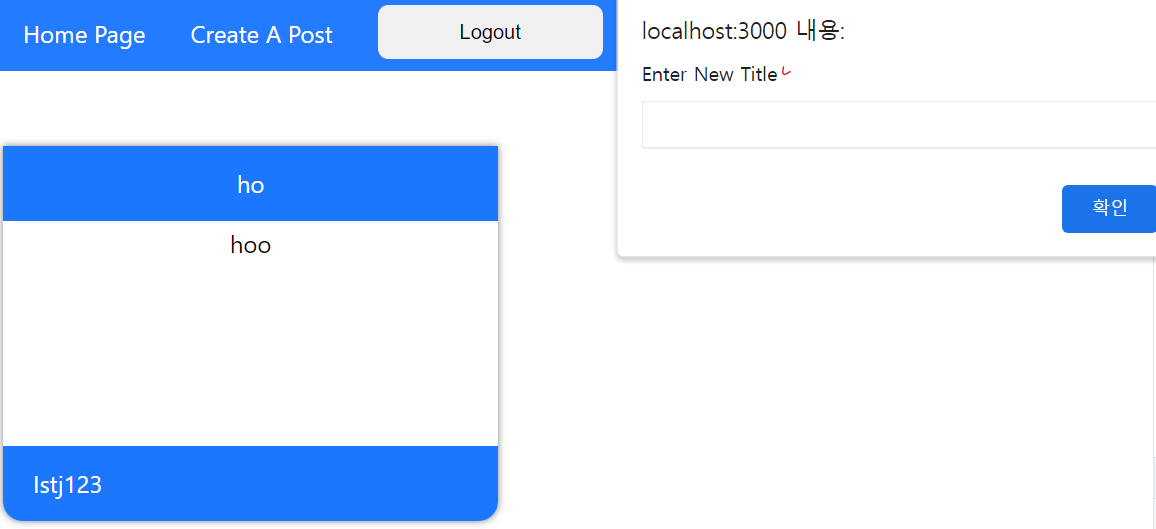
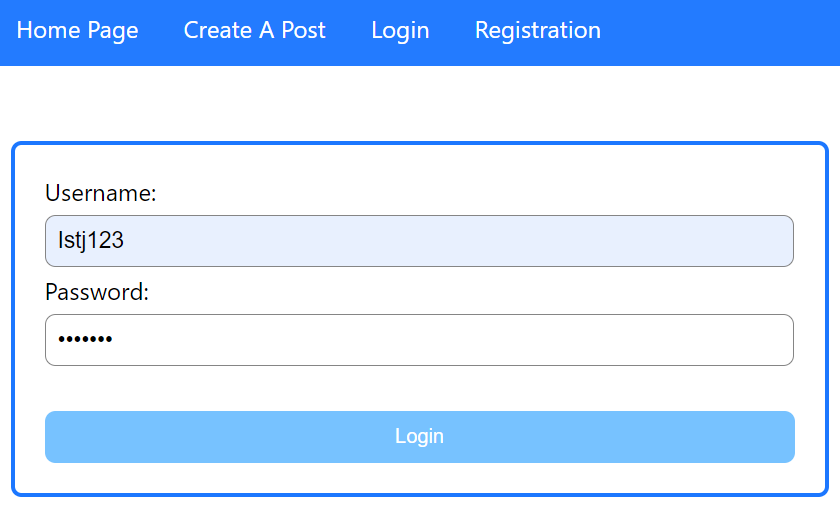
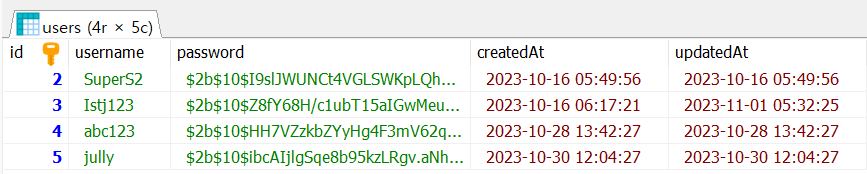
📌 결과
Post 제목 수정

비밀번호 변경


Users 테이블

📌 느낀 점
비밀번호와 글 수정은 일상생활에서도 자주 사용하는 기능인데 이번에 직접 구현해 보았습니다.
덕분에 어떤 방식으로 데이터가 수정되는지 수정되기 전에 어떤 데이터들을 확인하는지 알게 되었습니다. 그래서 해당 기능을 사용할 때 머릿속에서 데이터들이 전달되는 과정을 생각할 수 있게 되었습니다.
이제 팀프로젝트 기획 부분이 끝나서 코딩을 해야 하는데 이번에 배운 것들을 유용하게 쓸 수 있으면 참 좋을 것 같습니다.
이렇게 React, MySQL 포스팅을 마치겠습니다! 감사합니다!!
728x90
'MySQL' 카테고리의 다른 글
| axios.post()에서 여러 개 데이터를 보내야 할 때 (0) | 2023.11.18 |
|---|---|
| React, MySQL 13일차 (글 작성자 정보 보기) (2) | 2023.10.30 |
| React, MySQL 12일차 (좋아요 누르기) (2) | 2023.10.30 |
| React, MySQL 11일차 (로그아웃과 댓글 삭제하기) (0) | 2023.10.28 |
| React, MySQL 10일차 (댓글 작성자 화면에 표시하기) (0) | 2023.10.24 |